8Course
Updated in April 2025
List of all the enrolled courses (Teaching Subjects) in alphabetical order and grouped by term with the newest courses first, favourites at the top. Teachers can search, filter, and manage courses.
Change Course Duration to make it NOT accessible by students
8.1 Course Formation

-
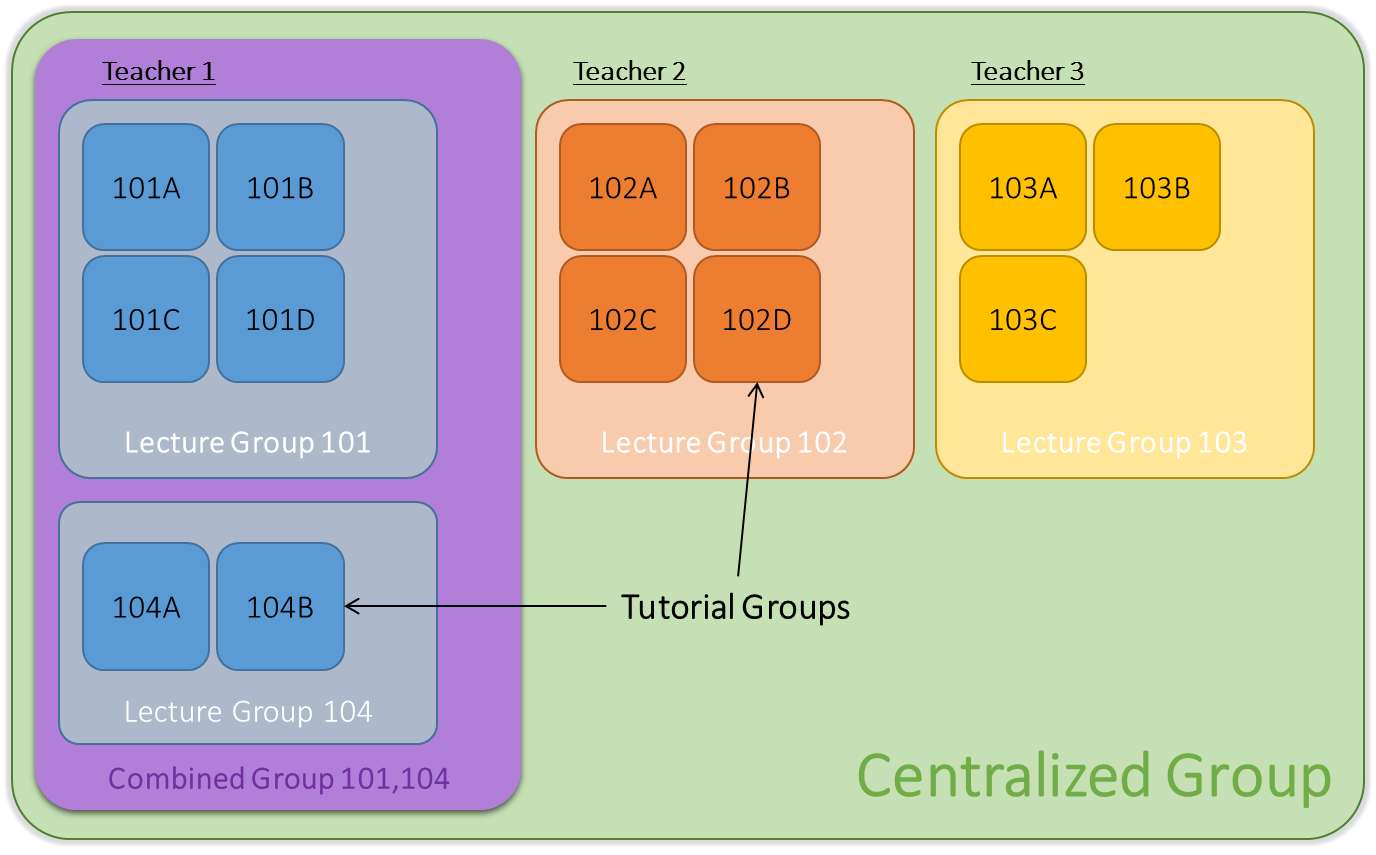
Individual Group / Tutorial Group :
- (Group 101A), (Group 101B), (Group 101C), (Group 101D), (Group 104A), (Group 104B)
- Automatically generated by Blackboard.
-
Lecture Group :
- (Lecture Group 101A,101B,101C,101D), (Lecture Group 104A,104B)
- Automatically generated by Blackboard.
-
Combined Group :
- (Combined Group 101A,101B,101C,101D,104A,104B)
- Automatically generated by Blackboard.
- Combined all individual groups by the same teacher.
-
Centralized Group :
- (Centralized Group)
- Grouped all students and teachers in the same subject.
- HKCC Subjects : Automatically generated by Blackboard. By default, Subject Leader will be granted with "Full editing right" and other Subject Lecturers will be granted with "Read-only right".
- SPEED Subjects : Created by request.
8.2 Course Accessibility
Course States:
-
Open
Teachers can open a course when they are ready for students to participate.
-
Private
Teachers can make a course private while teachers add or experiment with content, and then open it to students when they are ready. Students see private courses in their course lists, but they can't access them.
-
Hide
Teachers can choose to hide a course from their own Course List to organise the view.
This action will NOT affect the view of other teachers or students in the same course (i.e. students can still access to the course).
Note
Only teachers have the option to hide courses from their own Course List. Teachers can hide a course from their own Course List if they access to the course occasionally.
Note
Activities for the hidden courses no longer appears in the global pages.
Note
Hidden courses will NOT be shown under "Copy Content / Copy Items".
-
Complete
Teachers can choose to set the course to Complete when the course has ended, but teachers can no longer make changes to it. Students can access the content, but they can't participate in the course any longer. For example, they can't reply to discussions or submit assignments. Teachers can return the course to Open or Private as they want. However, if a course has an end date, and the end date passes, then students can't access the course any longer. So, if teachers complete a course and open it again after the end date, students can't access it.
Note
By default, all the created courses are accessible by students. Teachers need to make courses NOT accessible by students if the courses are empty (i.e. no content to be put on those courses).
To make a course NOT accessible by students, please update the Course Duration:

1
Go to the course, click "Course Settings".

2
Click "Edit" for the Course Duration.

3
In the Type field, choose "Dates" (originally, it chose "Term").


4
Update the "End Date" to current date and time (for recording when the course has been made NOT accessible by students), or set it be a passed date and time.
5
Click the "Apply Button" to confirm.

6
Now the course has been set to "Private", such that students CANNOT access to the course.
Note
To make the "Private Course" accessible by students, please change the "Course Duration" back to "Term".

For more about Course Duration, please refer to
[Blackboard Official Website]
Course Access
8.3 Course List
Each course card lists the course ID, course title, and instructor. If your course has multiple teachers, select Multiple Instructors for a list. Select More info to see the description and schedule (if any).

8.4 Browse by Term
Move to past, current, and upcoming courses. If teachers teach a lot of courses, they can choose how many appear on each page. At the bottom of the list, teachers will find a page selector to navigate through long lists.

8.5 Change the course list view (a list or a grid)
In the grid view, teachers can customise the image on the course cards. The minimum size for images is 1200 x 240 pixels with an aspect ratio of 4:1. Use this measurement to ensure the best quality. Open the menu in the top-right corner of a course card's image and select Edit course image to upload a new image.


8.6 Search the Course List
Use the search function to find courses on the current page.

8.7 Filter the Course List
Use the Filter menu to modify the view of the page. The filtered list stays as user access courses. If user navigate to another page, all courses show again.

8.8 View the Faviourite Courses Quickly
If users access some courses frequently, they can select the star button to add the courses to the favorites so those appears at the top of the list. Users can select the star button again to remove the courses from their favorites.

Blackboard Reference Materials:
[Blackboard Official Website]
Find Your Courses (Course Catalog is NOT available for Blackboard Ultra)
[Blackboard Official Website]
Course Settings


